Templates
Templates are the wording and the layout Apex Lucis reuses every time. There are two kinds, chosen with the control at the top of the screen: Documents, the PDFs you send, and Messages, the emails you send.
|  |
Accessing Templates
Templates tab — in the tab bar on iPhone, in the sidebar on iPad and Mac.
On iPhone, tap a template to open it. On iPad and Mac it opens in the pane beside the list.
The two kinds
| Kind | What it controls | Subscription |
|---|---|---|
| Documents | The layout of the PDFs you send — invoices, contracts, call sheets, crew sheets, model releases | Importing your own needs Pro |
| Messages | The wording of the emails you send — enquiries, chases, delivery notices, review requests | Free |
Pro Required: Bringing your own PDF layouts needs Apex Lucis Pro. Without it the Documents half shows the upgrade screen, and your PDFs are produced from the built-in layout for each type — every invoice, contract, call sheet, crew sheet and model release still generates normally. Messages are free for everyone.
Messages
Eleven occasions, each with wording already written. Change it to your own voice, or leave it as it is.
The occasions
| Occasion | What it is for |
|---|---|
| Enquiry Reply | When a new enquiry arrives, before anything is agreed |
| Booking Confirmation | Once the date is held, confirming what was booked |
| First Chase | The polite reminder, a few days after an invoice falls due |
| Second Chase | The firmer one, a fortnight after |
| Delivery Notice | When the images are ready, with the gallery link |
| Review Request | A week after delivery, asking for a review |
| Anniversary | About eleven months later, to ask about next year |
| Shoot Day Notes | What to wear and bring, on the one-pager sent before a shoot |
| Contract Nudge | A nudge when a contract has been sitting unsigned |
| Delivery Running Late | Owning it when something is past the date you promised |
| Before the Shoot | A short note in the days before the shoot |
The list is in the order a job actually runs, so it reads as the arc of a booking. A message you have edited carries an Edited badge.
Shoot Day Notes is the one that is not a message. It has no recipient and no subject, because it is the body of a page rather than something you send — the page around it already carries the date, the place and your phone number.
Editing a message
Select an occasion to open it. Name is what you call it in the list; the occasion itself stays as it is, so the row still reads “First Chase” whatever you name it. Below that is the message body.
Your wording is kept as you type and as you leave the screen — there is no Save button.
Restoring the original wording
Once you have edited a message, Restore the original wording appears at the bottom of the editor. It replaces your version with the one Apex Lucis ships with, and the Edited badge goes.
Warning: Restoring cannot be undone. Your wording is gone once the original is put back.
Where messages are sent
A booking’s Delivery tab offers Ask for a review once everything on the job has been handed over, and Ask about next year eleven months after the shoot. Either one opens your mail app with the message written out, the placeholders filled in and the client already addressed. Read it over, change anything you like, and send.
Both also appear on the Dashboard under Needs Attention — a review a week after the job finished, next year’s enquiry once the booking is nearly a year old — so the moment comes to you rather than needing to be remembered.
An overdue invoice offers First Chase, and Second Chase once it is a fortnight late — see Chasing an unpaid invoice.
Shoot Day Notes is not sent at all. It is the prose on the Shoot Day Page, built from the booking and shared as a web page.
Contract Nudge, Delivery Running Late and Before the Shoot are what the Automations draft for you. Each has an alert already; these are the words to go with it.
The remaining three — Enquiry Reply, Booking Confirmation and Delivery Notice — are yours to prepare in advance, or to let an automation write. Open one, copy the wording, and paste it into an email whenever you need it. A message copied out by hand still has its placeholders in it, so swap them for the real names, numbers and dates as you go.
Placeholders in messages
Placeholders are written in double curly braces, in capitals, and are filled in from the booking the message is sent from.
| Placeholder | Replaced with |
|---|---|
{{CLIENT_FIRST_NAME}} | The client’s first name — what the greetings use |
{{CLIENT_NAME}} | The client’s full name |
{{CLIENT_EMAIL}} | The client’s email address |
{{BOOKING_TITLE}} | The title of the booking |
{{SHOOT_DATE}} | The date of the shoot |
{{DELIVERABLES_NOUN}} | Your word for what the client is getting, from Settings → Company |
{{DELIVERABLES}} | What this booking is handing over, listed by name |
{{GALLERY_LINK}} | The gallery links recorded against the booking’s delivery items |
{{REVIEW_LINK}} | Your review link, from Settings → Company |
{{INVOICE_NUMBER}} | The invoice number — for the two chase messages |
{{INVOICE_DUE}} | When that invoice fell due |
{{INVOICE_TOTAL}} | What is owed on it |
{{PAYMENT_LINK}} | Your payment page, from Settings → Business |
{{COMPANY}} | Your company name, or your own name if you have not set one |
{{EMAIL}} | Your email address |
{{PHONE}} | Your phone number |
A line containing only placeholders that come back empty is left out of the message, so a booking with no gallery link loses that line rather than sending the client a stranded label. Put optional placeholders on a line of their own.
The two chase messages are sent from an invoice rather than a booking, so they fill in the invoice placeholders and leave the booking ones empty. Everything else is sent from a booking and works the other way round.
Naming what the client is getting. Two placeholders, answering different sentences. {{DELIVERABLES_NOUN}} is your collective word — images, photographs, artwork — for prose that does not list anything: “your artwork are ready”. {{DELIVERABLES}} names what this job is handing over, from the booking’s Delivery tab: “40 edited images, a 30×30 album and an online gallery”. A wedding and a headshot session hand over different things, so one word cannot do both jobs.
Tip: Set your Review Link in Settings → Company — your Google listing, a Trustpilot page, or a form on your own site. The review request drops it in for you, and without it the message goes out asking for a review with nowhere to leave one.
Tip: Set What You Deliver in the same place. Leave it empty and your clients are told their images are ready, which is right for most photographers and wrong for anyone selling albums or prints.
Documents
Every PDF Apex Lucis produces — invoices, contracts, model releases, crew sheets and call sheets — is built from a template. This half of the screen is where you review the templates that ship with the app, import your own, and choose which one is used for each document type.


The five document types
| Type | Used for |
|---|---|
| Call Sheet | Telling clients and crew the schedule, meeting point and tasks for a shoot |
| Contract | The agreement a client signs off on for a work package |
| Crew Sheet | Telling the crew the schedule and tasks for a shoot |
| Invoice | Requesting payment from a client |
| Model Release | The permission a model signs before a shoot |
Each type has its own set of placeholders, so a template written for one type will not work as another. You choose the type when you import.
Built-in templates
The first time you launch Apex Lucis, one built-in template is installed for each of the five types, named after the type it serves — Invoice, Contract, Call Sheet, Crew Sheet, Model Release. Each carries a Built-in badge in the list so you can tell it apart from anything you import.
This happens for everyone, with or without Pro. The built-ins are what non-Pro users’ documents are generated from.
Built-in templates cannot be deleted or replaced. If you try to delete one, the delete action is replaced by a “Can’t Delete” item, and no Replace action is offered. This is deliberate: it guarantees every document type always has at least one working template to fall back on, so you can never end up unable to produce an invoice.
You can, of course, import your own and make that the active one instead. The built-in stays in the list, unused.
The template list
Templates are grouped by type, with a section for each. A yellow star next to a template’s name means it is the active template for its type — the one the app will use when you generate that kind of document. A Built-in badge on the right of a row marks a template that shipped with the app.
Reviewing a document template
Select any template to open it in the detail pane. At the top you get a short description of what that document type is for, then a segmented control with two tabs.
Templates you imported also show an Updated date beneath the description. It changes whenever you replace the template’s file, which is how you confirm a replacement went through.
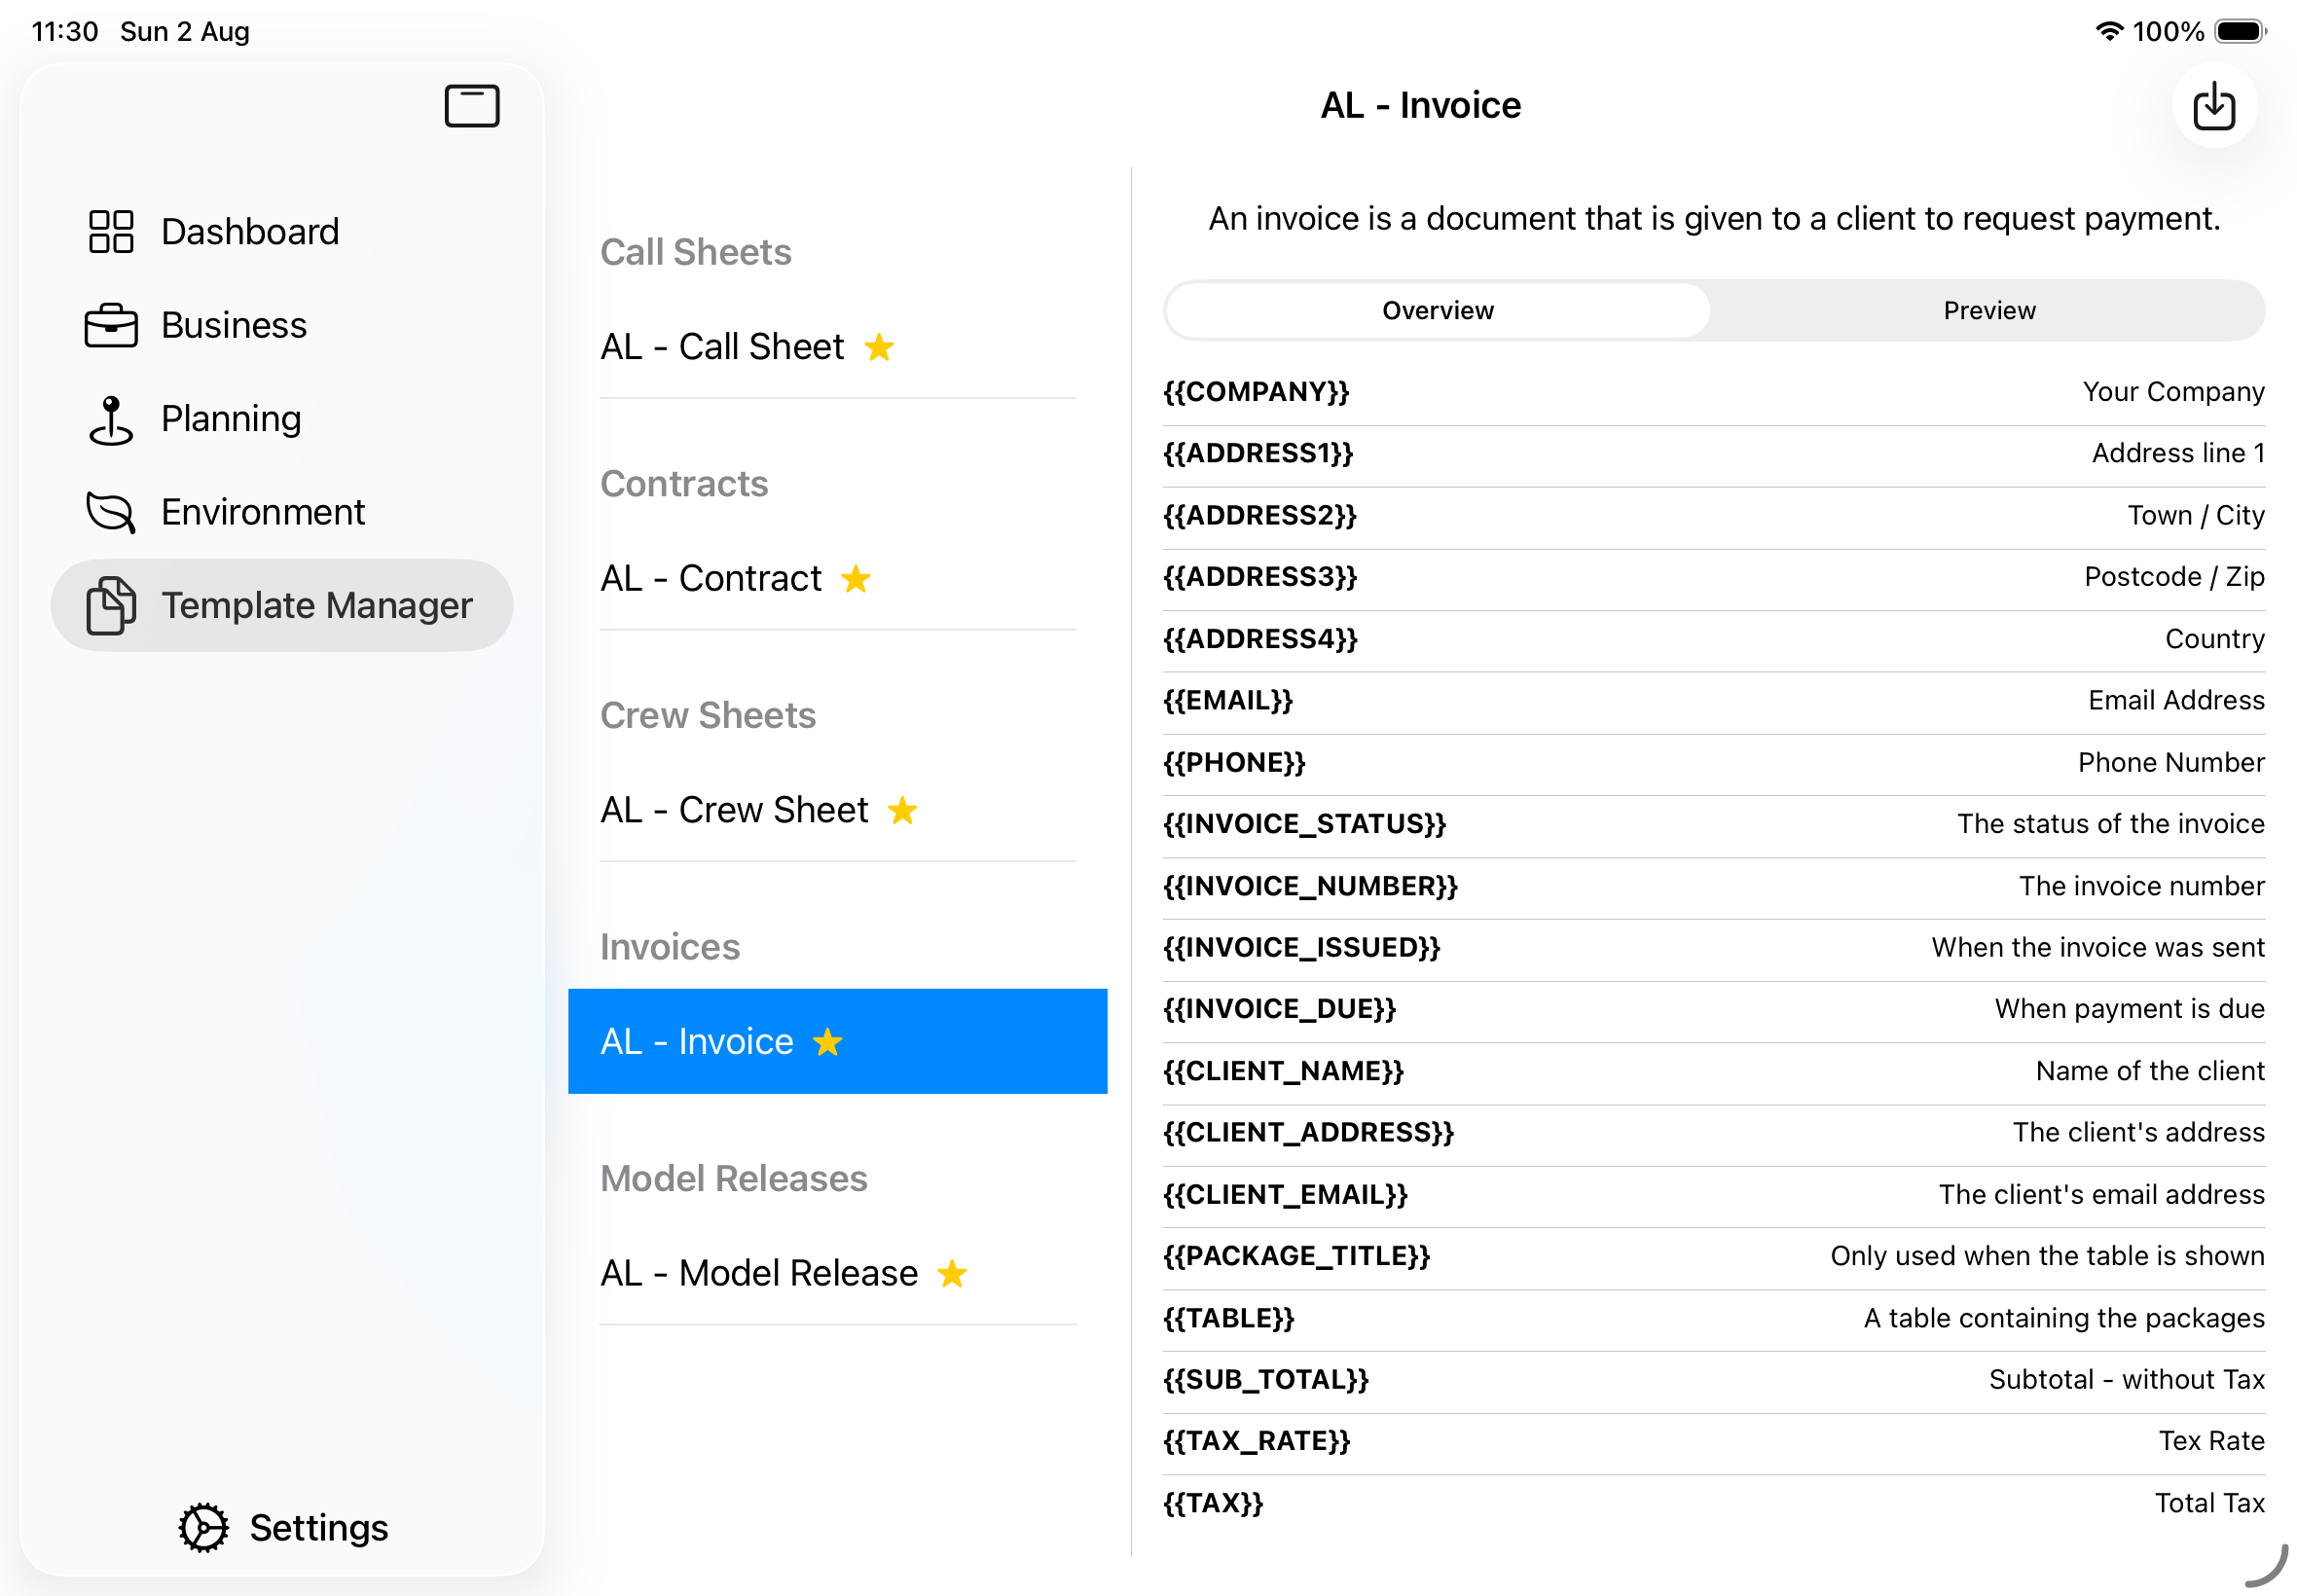
Overview
The Overview tab lists every placeholder available to this document type, with a plain-English description of what each one is replaced with. This is your reference sheet when writing a template — placeholders not on this list will not be filled in.
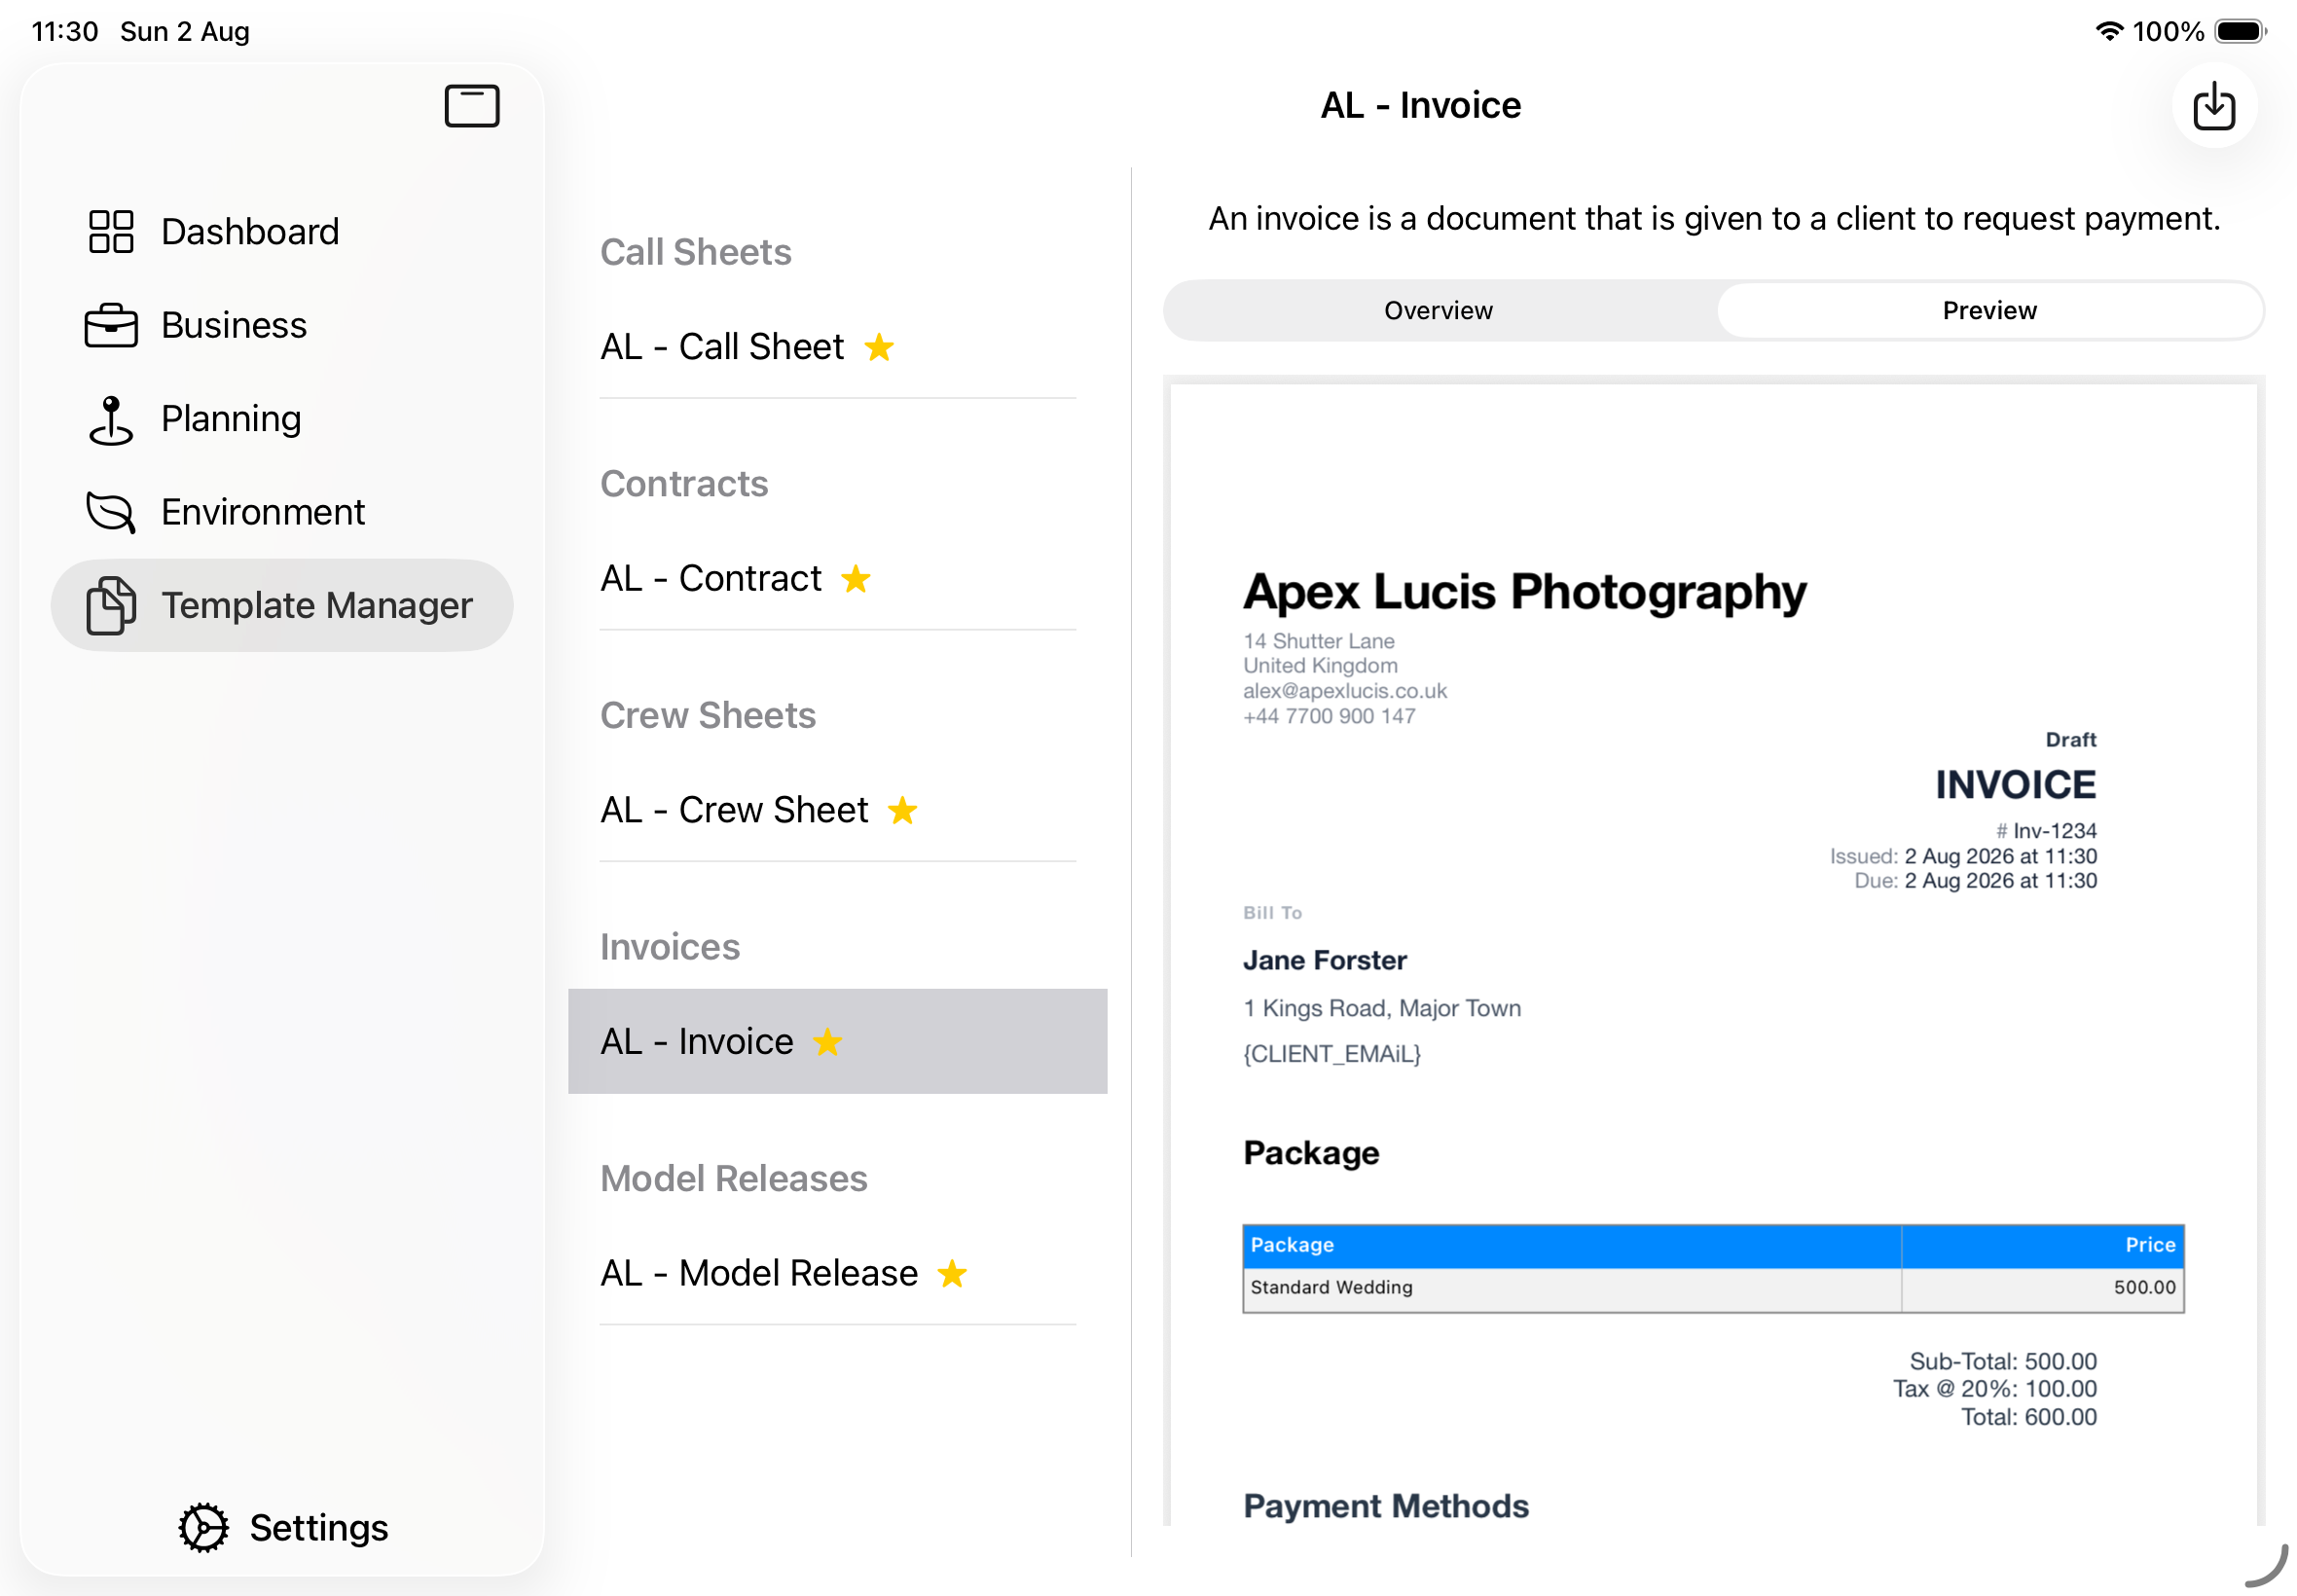
Preview
The Preview tab renders the template as a finished PDF using sample data — a made-up client, booking and set of figures. Nothing in the preview comes from your real records, so it is safe to look at with someone over your shoulder.
Use it to check layout: whether your logo sits correctly, whether the table has room, whether anything overflows onto a second page.
Choosing which template to use
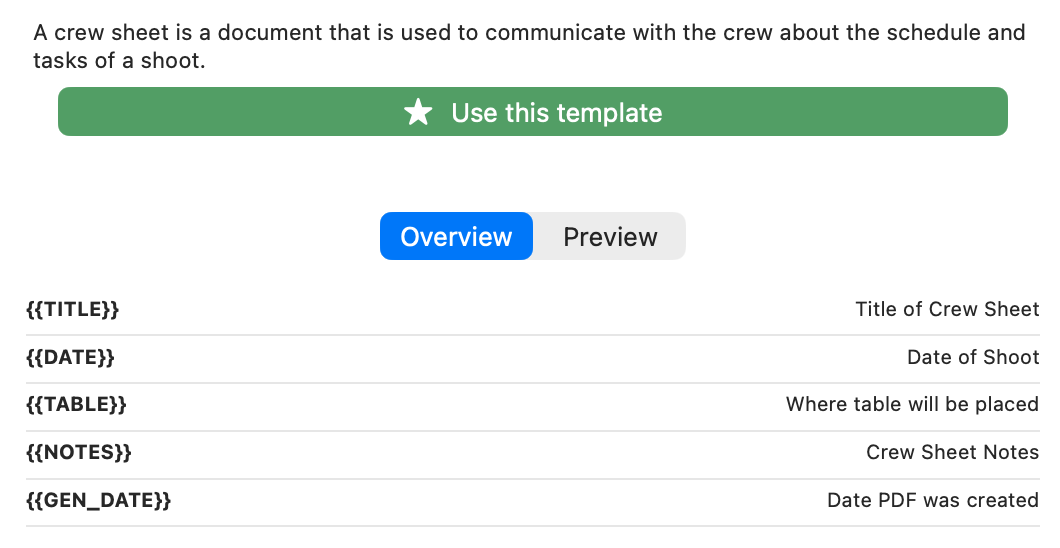
Only one template per type can be active at a time.
When you select a template that is not currently active, a Use this template button appears above the tabs. Tapping it makes that template active for its type and clears the star from whichever template previously held it. Every invoice you generate from then on uses the new template.
The button is hidden when you are looking at the template that is already active — if there’s no button, that one is already in use.
Importing your own template
Templates are RTF files (Rich Text Format). Write yours in any word processor that can save RTF — Pages, Word, TextEdit, Nisus — using the placeholder tokens listed in the Overview tab wherever you want app data to appear.
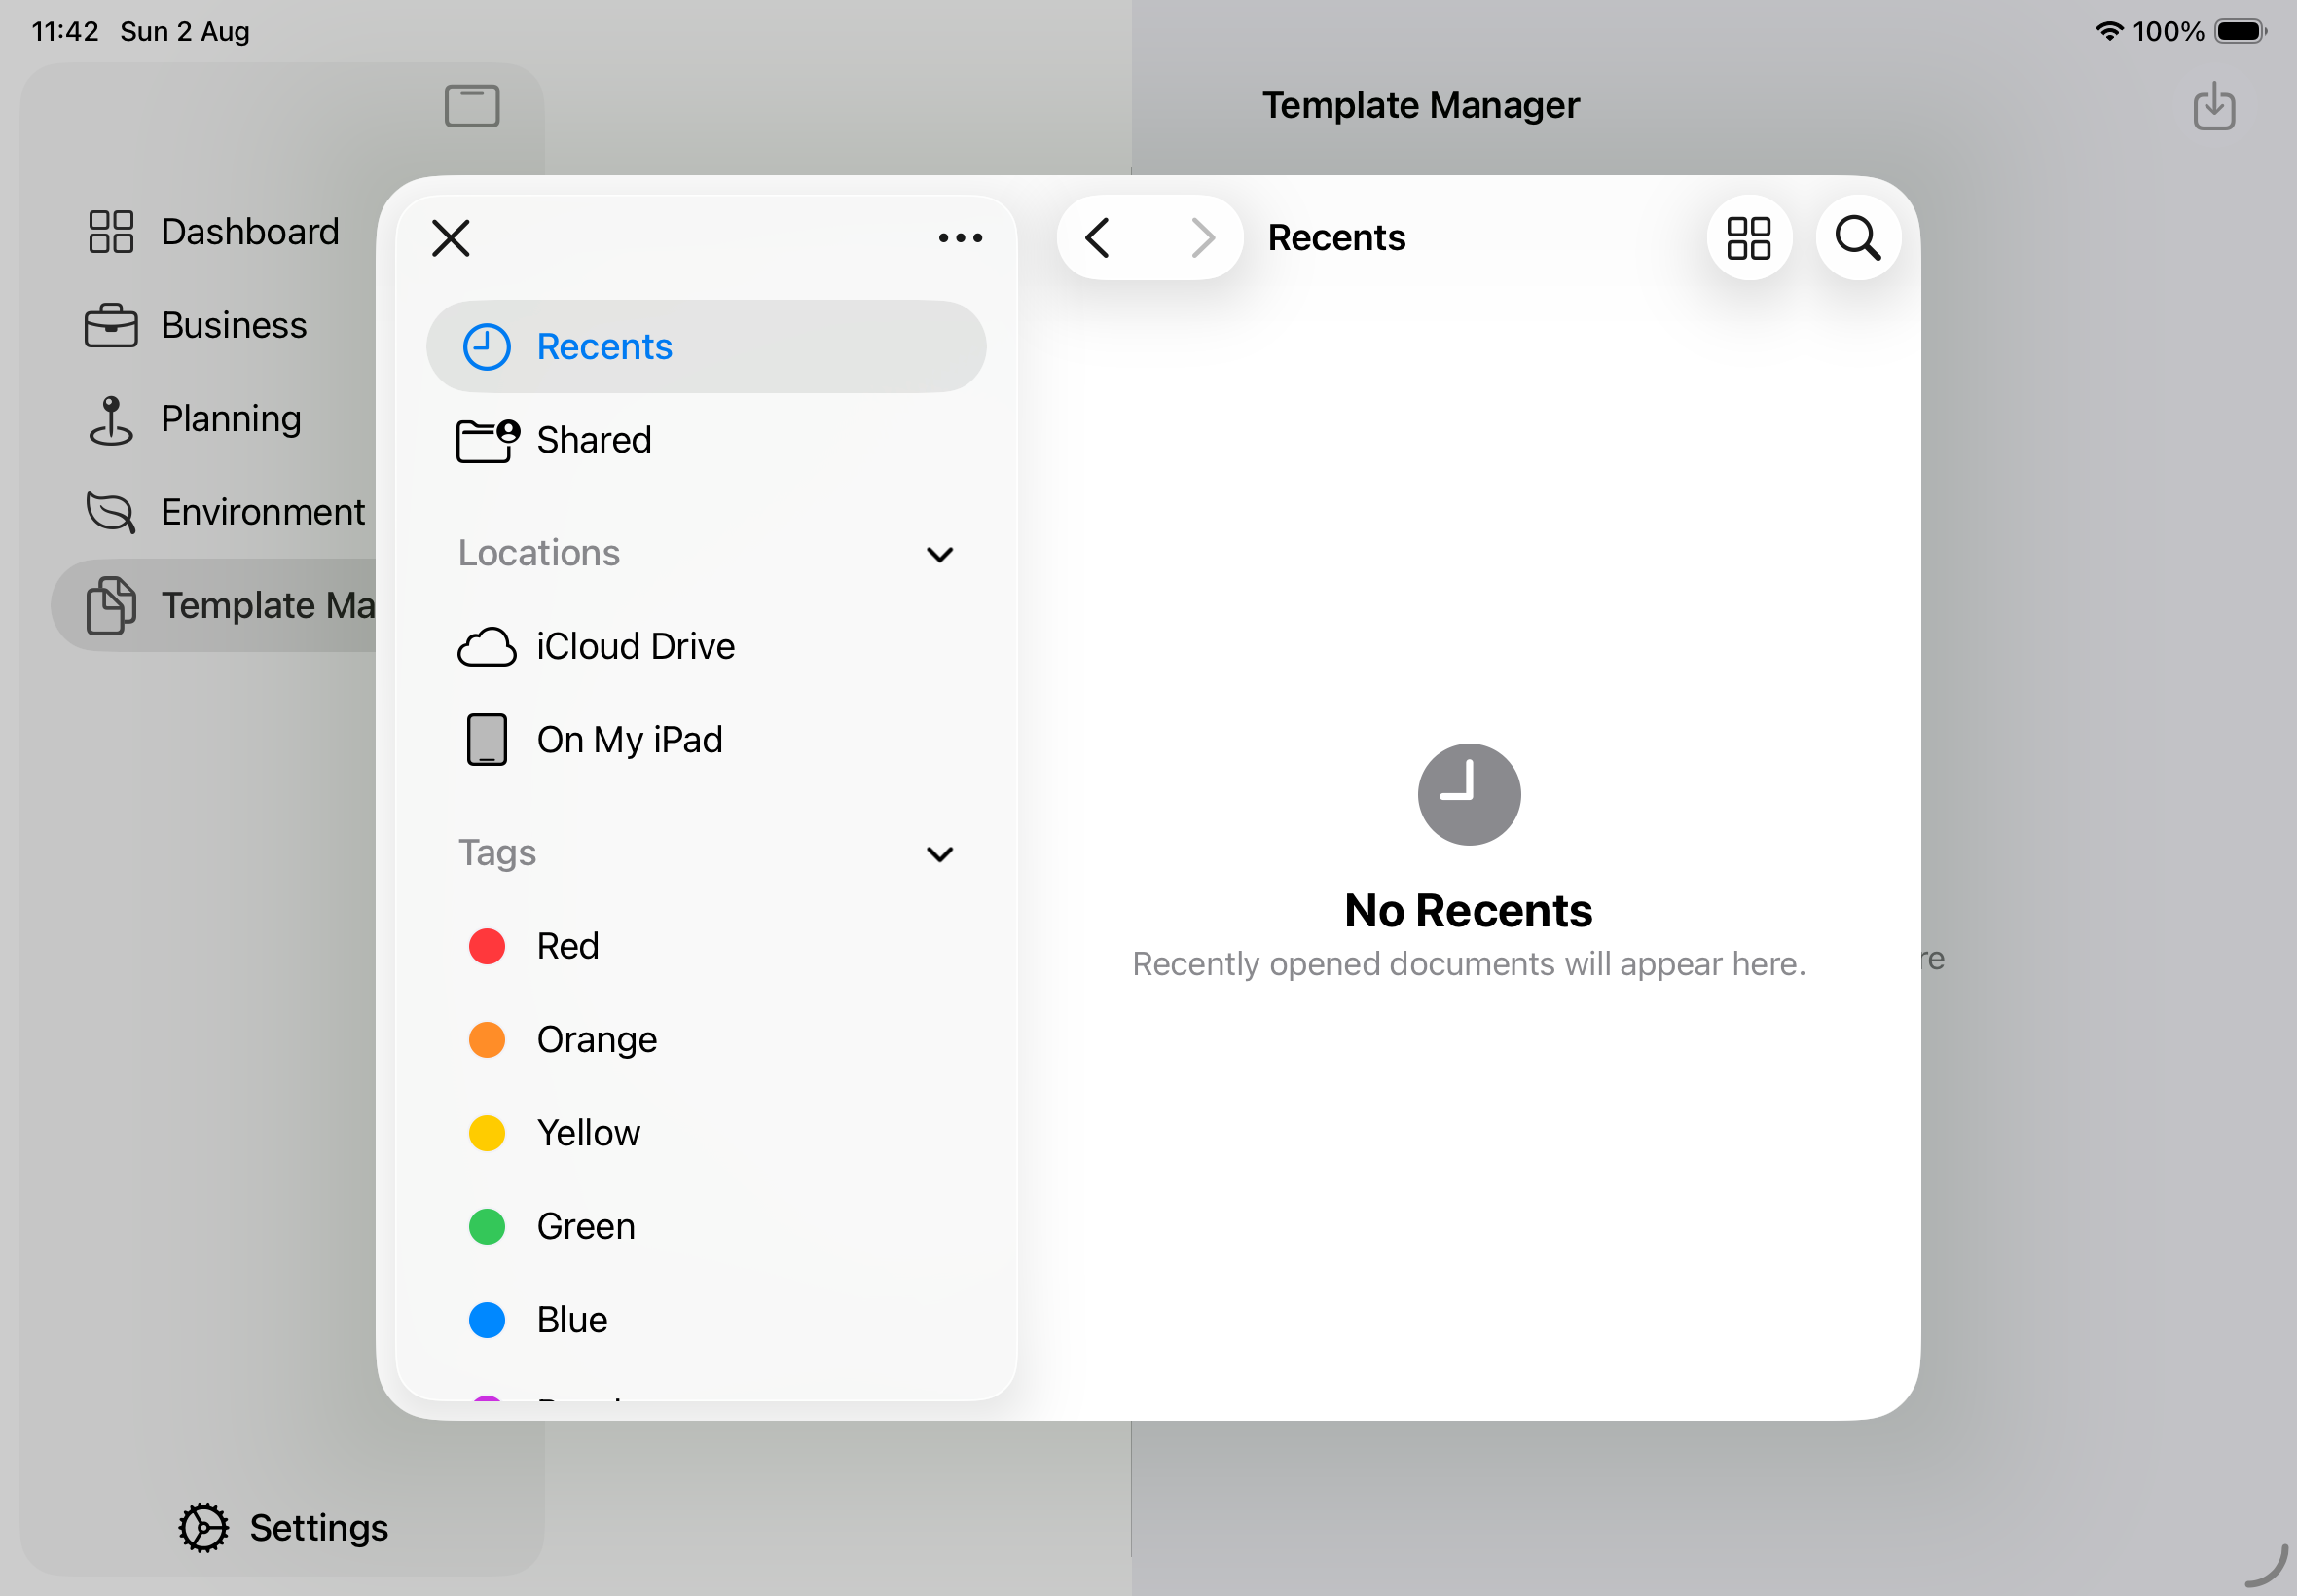
- Tap Import Template in the toolbar (the download-arrow icon, top right).
- Choose your
.rtffile. Only RTF files can be selected. - Pick which of the five document types the template is for, then tap Import.
The imported template takes its name from the filename, capitalised — a file called studio invoice 2026.rtf becomes a template named “Studio Invoice 2026”. Name your files accordingly.
Importing does not automatically make the template active. Select it in the list and tap Use this template when you’re ready to switch.
If the file cannot be read, or is not really an RTF document, the import is refused with a “Could not import template” message naming the file, and nothing is added to the list. This most often catches a file that has been renamed to .rtf without actually being converted — a .docx or a .pages file saved under the wrong extension. Re-export it as Rich Text Format from your word processor and try again.
Updating a template — replacing its file
When you edit a template on your computer, the copy inside Apex Lucis does not change. To pick up your edits, replace the template’s file.
- iPad — swipe left on the template row and choose Replace File.
- Mac — right-click (or Control-click) the row and choose Replace File.
- Either — select the template and use the Replace File button in the detail pane, next to Use this template.
Then choose the edited .rtf. That’s the whole flow — you are not asked which document type it is, because the template keeps the type it already had.
Everything about the template stays as it was except its contents:
| Kept | Changed |
|---|---|
| Its name | The document layout and wording |
| Its document type | The Updated date in the detail pane |
| Whether it is the active template (the yellow star) |
That last one is the point. Replacing the file on your active invoice template means your very next invoice uses the edited version, with nothing else to do. If instead you deleted the old template and imported the new one, the star would be lost and your invoices would quietly revert to the built-in layout until you remembered to press Use this template again.
Replacing an inactive template does not make it active — swapping a file is not the same as choosing to use it.
Replacing cannot be undone. The old contents are gone once the new file is read. If you might want to go back, keep the previous
.rtfon your computer, or import it as a second template rather than replacing.
A file that isn’t valid RTF is refused the same way as on import, and — importantly — the existing template is left untouched. A bad file cannot break a template you are relying on.
Built-in templates cannot be replaced, so no Replace action appears on them. Import your own version as a new template and make that active instead.
Deleting a template
- iPad — swipe left on the template row.
- Mac — right-click (or Control-click) the row and choose Delete.
Built-in templates show “Can’t Delete” instead.
If you only want to update a template, use Replace File above rather than deleting and re-importing — it keeps the template’s name and active status.
Writing a document template
Placeholder syntax
Placeholders are written in double curly braces, in capitals, exactly as shown in the Overview tab:
Invoice {{INVOICE_NUMBER}}
Due: {{INVOICE_DUE}}

{{CLIENT_NAME}}
{{CLIENT_ADDRESS}}
Formatting is preserved. If you make {{TOTAL}} bold and 18pt, the replaced figure comes out bold and 18pt — so style the placeholder itself in your word processor, not the text around it.
Empty lines disappear
If a line contains only placeholders and every one of them resolves to empty, the whole line is removed from the finished PDF. A client with no second address line will not leave a blank gap in the address block. This means you can write a generous template covering every optional field without worrying about holes in the output for clients who don’t have them all filled in.
A line that mixes placeholders with literal text is always kept, because the literal text is still content. Phone: {{PHONE}} on a record with no phone number leaves a stranded “Phone:” — so put optional fields on their own lines.
The {{TABLE}} marker
{{TABLE}} is special. It is not replaced with text — it marks the position on the page where the app draws a real table. On an invoice that’s the package line items; on a crew sheet it’s the crew listing.
Put {{TABLE}} alone on its own line, with enough vertical space beneath it for the table to grow. The table is drawn at the marker’s position, so anything you place immediately below may be overlapped if the table is longer than expected. Check the Preview tab.
{{SLOTS}} and {{CREW}} on call sheets work the same way — they are insertion points, not text substitutions.
The {{PAYMENT_QR}} marker
Another insertion point rather than a substitution: it marks where the app draws a square code the client scans with a phone camera to reach your payment page.
Put it alone on its own line, where you want the code to sit. It takes the link from Settings → Business, or from the invoice’s own Payment Link field if that has one — the same address {{PAYMENT_LINK}} prints, so the two can never point somewhere different.
Leave the marker out and no code is drawn, however good the link is. An imported template only gains a code once you add it. With no link set anywhere, a template carrying the marker simply closes the space up.
Placeholder reference — documents
Invoice
Company details come from Settings → Company; bank details from Settings → Business.
| Placeholder | Replaced with |
|---|---|
{{COMPANY}} | Your company name |
{{ADDRESS1}} | Address line 1 |
{{ADDRESS2}} | Town / City |
{{ADDRESS3}} | Postcode / Zip |
{{ADDRESS4}} | Country |
{{EMAIL}} | Your email address |
{{PHONE}} | Your phone number |
{{INVOICE_STATUS}} | Status of the invoice |
{{INVOICE_NUMBER}} | The invoice number |
{{INVOICE_ISSUED}} | When the invoice was sent |
{{INVOICE_DUE}} | When payment is due |
{{CLIENT_NAME}} | Name of the client |
{{CLIENT_ADDRESS}} | The client’s address |
{{CLIENT_EMAIL}} | The client’s email address |
{{PACKAGE_TITLE}} | The word “Package”, shown only when the table has rows |
{{TABLE}} | Insertion point for the package line-item table |
{{SUB_TOTAL}} | Subtotal, excluding tax |
{{TAX_RATE}} | Tax rate, e.g. “20%” |
{{TAX}} | Total tax |
{{TOTAL}} | Total including tax |
{{SORT_CODE}} | Bank sort code |
{{BANK_ACCOUNT}} | Bank account number |
{{PAYMENT_LINK}} | Your payment page, as an address |
{{PAYMENT_QR}} | Insertion point for a scannable code carrying that same link |
{{NOTES}} | Any notes on the invoice |
Contract
| Placeholder | Replaced with |
|---|---|
{{NAME}} | Photographer’s name |
{{CLIENT_NAME}} | Client’s name |
{{BOOKING_TITLE}} | Booking title |
{{SHOOT_DATE}} | Date of shoot |
{{TOTAL_AMOUNT}} | Total cost of shoot |
Call Sheet
| Placeholder | Replaced with |
|---|---|
{{TITLE}} | Title of shoot |
{{SHOOT_DATE}} | Date of shoot |
{{MEETING_POINT}} | Where to meet |
{{EMERGENCY_CONTACT}} | Emergency contact |
{{SLOTS}} | Insertion point for the time-slot listing |
{{CREW}} | Insertion point for the crew listing |
{{DATE}} | Date the PDF was created |
Crew Sheet
| Placeholder | Replaced with |
|---|---|
{{TITLE}} | Title of crew sheet |
{{DATE}} | Date of shoot |
{{TABLE}} | Insertion point for the crew table |
{{NOTES}} | Crew sheet notes |
{{GEN_DATE}} | Date the PDF was created |
Model Release
| Placeholder | Replaced with |
|---|---|
{{COMPANY}} | The name of the company |
{{MODEL_NAME}} | The name of the model |
{{GUARDIAN}} | Guardian’s name, if the model is below legal age |
{{SHOOT_TITLE}} | The title of the shoot |
{{USAGES}} | What the images may be used for |
{{EXCLUSIONS}} | What the images may not be used for |
{{TERRITORY}} | Where in the world the images may be used |
{{DURATION}} | How long the release is valid for |
{{COMPENSATION}} | The model’s compensation |
Troubleshooting
A placeholder appears literally in my PDF, braces and all. The token isn’t recognised for that document type. Check it against the Overview tab — spelling, capitalisation and the double braces all have to match exactly. Copying the token straight from the Overview tab avoids the problem entirely.
My changes to a template file aren’t showing up. Importing copies the file into the app, so editing the original .rtf afterwards changes nothing. Use Replace File on the template row (or the Replace File button in the detail pane) and choose your edited file. The template keeps its name and stays active, so there is nothing else to do.
The wrong template is being used. Check which row has the yellow star. Selecting a template only opens it for review; it isn’t in use until you tap Use this template.
A table overlaps the text below it. The table is drawn at the {{TABLE}} marker and grows downward. Move the marker up, or clear more space beneath it, and check the result in the Preview tab.
The Documents half shows an upgrade screen instead of my templates. Bringing your own PDF layouts is a Pro feature. Subscribe, or use Restore Purchases in Settings → About if you have subscribed before. Messages are unaffected, and your documents still generate without Pro — they use the built-in template for each type.
I subscribed before and now my custom templates have gone. They haven’t been deleted. When a subscription lapses the Documents half locks again, so the list sits behind the upgrade screen and your documents fall back to the built-in templates. Everything you imported is still there and becomes active again as soon as Pro is restored.
A placeholder appears literally in a message I sent. Check it against the table in Placeholders in messages — spelling, capitalisation and the double braces all have to match exactly. A message sent from a booking fills in what that booking knows about; anything else is left as you typed it.
The review request goes out with no link in it. Set your Review Link in Settings → Company. Until it is filled in, the line carrying the link is left out of the message.
I edited a message and want the original back. Open it and use Restore the original wording at the bottom of the editor.
“Could not import template” when picking a file. The file could not be read, or is not really an RTF document despite its name. Re-export it as Rich Text Format from your word processor. If you were replacing an existing template, it has been left exactly as it was.